This repository will not be updated. The repository will be kept available in read-only mode.
Use API Connect for OAuth functions, App Connect for API orchestration, and Node.js to develop the banking application
In a microservices based solution, security and orchestration of workflows are common requirements across solutions.
Let us consider the example of funds transfer in a personal banking scenario. The customer wishing to perform a funds transfer must be securely authenticated and authorized to perform the operation. Also, the funds transfer functionality requires integration with other applications or APIs to complete a transaction.
In this code pattern, we demonstrate the security and orchestration of microservices using a personal banking use-case scenario. The IBM API Connect and IBM App Connect available on IBM Cloud is used to implement the functionality. API Connect is used to provide OAuth based authorization security to microservices, and App Connect Enterprise for easier and seamless integration of APIs (with zero code) for a business user. The solution comprises authentication and funds transfer functionality.
At the end of this code pattern, users will understand:
- Authentication and authorization using OAuth in API Connect.
- Funds transfer operation with orchestration of APIs exposed by
Account Management Service,Credit Account ServiceandDebit Account Serviceusing App Connect. - To build and deploy Node.js microservices on IBM Kubernetes Service.
- Development of a client application using Node-RED.
The Public Access Code scheme of OAuth2 is used for authorization. Since the customer has to authorize the operation, the public scheme is suitable as the application is incapable of maintaining the secrecy of the client secret. In the access code flow, the application has the user provide authorization through a form provided by the gateway server, which, if they grant authorization, provides an authorization code to the application.
In the funds transfer scenario, the following operations are orchestrated using App Connect flow:
- Balance check using
Account Management Service. - Perform a debit of customer account using
Debit Account Service. - Perform a credit of payee account using
Credit Account Service.
In case of a failure in the credit operation, the transaction is rolled back and the amount is credited back to the customer account.

- User logs-in to the client application.
- Login Request will go to API Connect.
- API Connect uses Login API for authentication. And then it generates OAuth token for authorization.
- The user invokes the
funds transfertransaction using the OAuth token. The request goes to app connect flow which internally usesAccount Management API,Credit Account APIandDebit Account API.
Note:
- All microservices are deployed on IBM Kubernetes Service.
- All APIs interact with MongoDB.
- IBM Cloud Account
- Git Client - needed for clone commands.
Follow these steps to setup and run this code pattern. The steps are described in detail below.
- Get the code
- Create IBM Cloud Services
- Setup environment for Kubernetes CLI
- Deploy Mongo DB
- Deploy Microservices
- Configure App Connect
- Configure API Connect
- Deploy client application
- Analyze the result
- Clone the repo using the below command.
git clone https://github.com/IBM/microservices-using-apiconnect-and-appconnect.git
Create a Kubernetes cluster with Kubernetes Service using IBM Cloud Dashboard. This pattern uses the free cluster.

Note: It can take up to 15-20 minutes for the cluster to be set up and provisioned.
Create an instance of IBM App Connect. Ensure lite plan is selected. Click Create.

A new instance of IBM App Connect should be created.
Create an instance of IBM API Connect. Ensure lite plan is selected. Click Create.

A new instance of IBM API Connect should be created.
Create an instance of Node-RED. Ensure lite plan is selected. Click Create.

A new instance of Node-RED should be created.
Note the base url of Node-RED as shown below:

Check status of your Kubernetes Cluster
-
Check the status of your cluster
IBM Cloud Dashboard -> Clusters -> <your cluster>. If status is notNormal, then you need to wait for some more time to proceed further. -
Once your cluster is ready, open the access tab
IBM Cloud Dashboard -> Clusters -> <your cluster> -> Access. Perform the steps provided under this section to get access of your cluster throughkubectlCLI. -
Verify that the kubectl commands run properly with your cluster by checking the Kubernetes CLI server version.
$ kubectl version  --short
Client Version: v1.14.6
Server Version: v1.16.7+IKS
Get the public IP for Kubernetes Cluster
Once cluster is up and running then find out the public IP of your cluster. It will be required for further steps.
-
Go to
IBM Cloud Dashboard -> Clusters -> <your cluster>. It gives you details of the cluster. -
Access
Worker Nodestab, it will show you the public IP of your cluster as shown in below screenshot.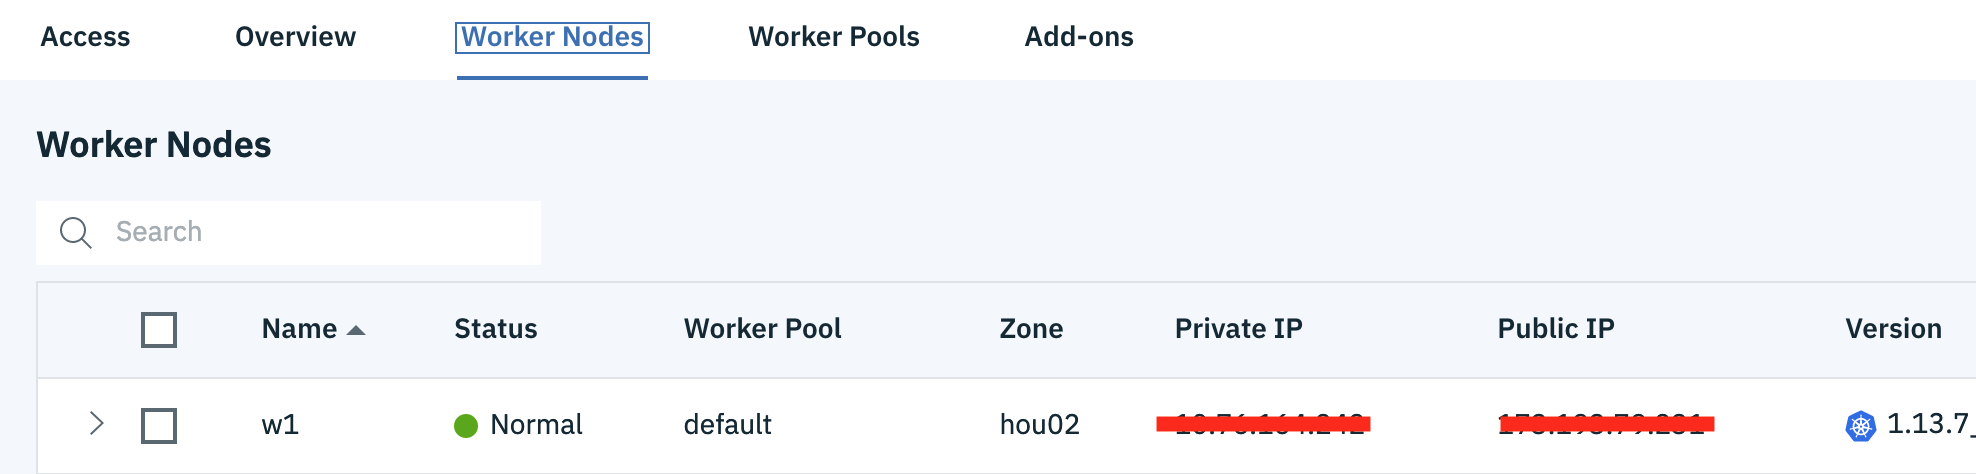

Make a note of this public IP. It will be used in further steps.
Create namespace on IBM Cloud container registry
IBM Cloud Container Registry is used to store and access private container images. If you have not created namespace before or you want to use a different
namespace than existing one, then need to create a new namespace. You can create a namespace through interface as
Navigation > Kubernetes > Registry > Namespaces > Create or using the following CLI commands:
  # To create a namespace
  $ ibmcloud cr namespace-add <my_namespace>

  # To verify that namespace is created
  $ ibmcloud cr namespace-list
In this pattern, mongo db will be deployed in a container and will be used by all the microservices. Perform the following steps to deploy Mongo DB in a container.
   $ cd mongodb
   $ kubectl create -f deploy_mongodb.yaml
After deployment, the status can be checked as:
   $ kubectl get pods
   NAME                    READY   STATUS    RESTARTS   AGE
   mongo-8dc7685d7-nxrcr   1/1     Running   0          73s

   $ kubectl get services |grep mongo
   mongo        NodePort    172.21.84.39   <none>        27017:32643/TCP   11m
The connection_url to connect to mongodb will use <public_ip_of_cluster>:<mongo_service_port>. Use the public IP of your Kubernetes cluster retrieved in step 3 above. The mongo_service_port in this case, is 32643 (as shown in the above command). This connection url will be used by microservices to connect with mongo db.
For this application, we are creating microservices for authentication (login), bank account management, credit account and debit account functionality. A set of user credentials and bank account details are pre-defined in Mongo DB.
Perform the following steps to deploy microservices.
Update MongoDB Connection String
Prepare connection url as explained in step 4. Then execute the following commands to update mongo db connection url in app.js of all four microservices as per your system(linux/mac).
   ## For MAC
   cd ../microservices
   sed -i '' s#CONNECTION_URL#x.x.x.x:port# login_service/app.js
   sed -i '' s#CONNECTION_URL#x.x.x.x:port# account_management_service/app.js
   sed -i '' s#CONNECTION_URL#x.x.x.x:port# debit_service/app.js
   sed -i '' s#CONNECTION_URL#x.x.x.x:port# credit_service/app.js

   ## For Linux
   cd ../microservices
   sed -i s#CONNECTION_URL#x.x.x.x:port# login_service/app.js
   sed -i s#CONNECTION_URL#x.x.x.x:port# account_management_service/app.js
   sed -i s#CONNECTION_URL#x.x.x.x:port# debit_service/app.js
   sed -i s#CONNECTION_URL#x.x.x.x:port# credit_service/app.js
Prepare deploy target
All four docker images needs to be pushed to your docker image registry on IBM Cloud. You need to set the correct deploy target. Depending on the region you have created your cluster in, your URL will be in the following format:
<REGION_ABBREVIATION>.icr.io/<YOUR_NAMESPACE>/<YOUR_IMAGE_NAME>:<VERSION>
The following command tells you the Registry API endpoint for your cluster. You can get region abbreviation from the output.
ibmcloud cr api
To get namespace use the following command:
ibmcloud cr namespaces
For example, to deploy the login microservice to my docker image registry in the US-South region, my deploy_target will be:
us.icr.io/test_namespace/login_app:v1.0
Deploy login microservice
Execute the following steps.
$ cd login_service
Build dockerfile and push the image to registry.
$ ibmcloud cr build -t <DEPLOY_TARGET> .
Update image location(deploy target) in deploy.yaml.
$ sed -i '' s#IMAGE#<DEPLOY_TARGET># deploy.yaml     ## mac
OR
$ sed -i s#IMAGE#<DEPLOY_TARGET># deploy.yaml      ## linux

$ kubectl create -f deploy.yaml

$ kubectl get services|grep login
login-service   NodePort    172.21.113.169   <none>        8080:32423/TCP    31s
The login microservice will be accessible at http://<public_ip_of_cluster>:<login_service_nodeport>. Use the public IP of your Kubernetes cluster retrieved in step 5. The login_service_nodeport in this case is 32423 (shown in above command). To use login functionality of this service, access http://<public_ip_of_cluster>:32423/login.
Deploy account_management service
Following are the steps for account_management service.
  cd ../account_management_service
  $ ibmcloud cr build -t <DEPLOY_TARGET> .

  $ sed -i '' s#IMAGE#<DEPLOY_TARGET># deploy.yaml    ## mac
  OR
  $ sed -i s#IMAGE#<DEPLOY_TARGET># deploy.yaml     ## linux

  $ kubectl create -f deploy.yaml

  $ kubectl get services | grep acc
  account-details-service   NodePort    172.21.166.106   <none>        8080:32424/TCP    33s
Account management functionality of this service can be accessed by using http://<public_ip_of_cluster>:32424/check_accounts.
Deploy debit_account service
Following are the steps for debit account service.
  cd ../debit_service
  $ ibmcloud cr build -t <DEPLOY_TARGET> .

  $ sed -i '' s#IMAGE#<DEPLOY_TARGET># deploy.yaml     ## mac
  OR
  $ sed -i s#IMAGE#<DEPLOY_TARGET># deploy.yaml      ## linux

  $ kubectl create -f deploy.yaml

  $ kubectl get services |grep debit
  debit-account-service     NodePort    172.21.138.208   <none>        8080:32425/TCP    16s
Debit account functionality of this service can be accessed by using http://<public_ip_of_cluster>:32425/debit_account.
Deploy credit_account service
Following are the steps for credit account service.
  cd ../credit_service
  $ ibmcloud cr build -t <DEPLOY_TARGET> .

  $ sed -i '' s#IMAGE#<DEPLOY_TARGET># deploy.yaml    ## mac
  OR
  $ sed -i s#IMAGE#<DEPLOY_TARGET># deploy.yaml     ## linux

  $ kubectl create -f deploy.yaml

  $ kubectl get services|grep credit
  credit-account-service    NodePort    172.21.51.254    <none>        8080:32426/TCP    11s
Credit account functionality of this service can be accessed by using http://<public_ip_of_cluster>:32426/credit_account
Note: We have defined NodePort of all four microservices. Please change the ports if not available in your Kubernetes Cluster.
If you want to test your microservices, please refer to test instructions. Else continue to next step.
Use App Connect to connect your different applications and make your business more efficient. Set up flows that define how data is moved from one application to one or more other applications. App Connect supports a range of skill levels and interfaces, giving you the flexibility to create integrations without writing a single line of code. You can use a web user interface or drop resources into a toolkit that gives a broader range of configuration options. Your entire organization can make smarter business decisions by providing rapid access, visibility, and control over data as it flows through your business applications and systems from a single place - App Connect. Find more App Connect resources in Learn More section.
Following image shows App Connect flow for funds transfer functionality and the steps in the below sub-sections explain how to import/develop this flow.

- On IBM Cloud dashboard, click the App Connect service instance created in earlier step and will be be listed under
Cloud Foundry Services - Click
Launch App Connectbutton on the App Connect Service home page.
The OpenAPI Specification, previously known as the Swagger Specification, is a definition format for describing REST APIs. You can import OpenAPI documents that contain API definitions into IBM App Connect. Each imported document is added as an API to the App Connect catalog of applications and APIs, and can be used to call the API from a flow.
For the microservices used in this code pattern, the REST APIs definition files are available under app-connect-resources/microservices-apis folder.

- On App Connect top menu, click
Catalog->APIs->Add your API or web service now->Add an OpenAPI definition, WSDL or ZIP - Browse to
app-connect-resources/microservices-apisfolder and selectAccount_Check.jsonfile. - Specify the name to be
Account_Check. While any unique name can be given to APIs, we will maintain the names specified here so that the flow that we will import in later steps work with the APIs, without error. - Optional. Add a description that summarizes the function of the API.
- Click
Add. ClickAdd your API or web service now. Click "Add an OpenAPI definition, WSDL or Zip". - Select the
Account CheckAPI json file to import. - Enter name as
Account_Check. Enter something in Description field, if required. Then click onAdd API. - Expoand
Importedand clickConnect. - Under
Override the hostnameand port of the Account_Check server:(optional)enter the Account_Check microservice's IP address and port. e.g.http://173.193.79.231:32424. - Click
Connect. - Similarly add APIs
Debit_Transaction(name should beDebit_Transaction) andCredit_Transaction(name should beCredit_Transaction). - As a sanity check, verify that the microservices are working fine using a REST client like postman.
- Click
Import Flowbutton. The flow should be imported now. - On the top right corner of the browser page, click the
Newbutton and selectImport Flow....
- Click "Add a YAML file". Browse the cloned repository and select
Flow.yamlfile inapp-connect-resourcesfolder.
- When imported click on
Operationstab ->Edit Flowbutton and verify that there are no visible error indicator. - You have imported the flow.


- Now that you have imported the flow, you need to test it.
- Navigate to App Connect dashboard and start the flow.
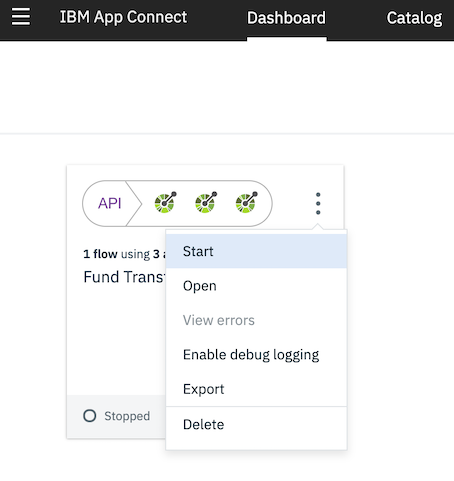
- Click on the flow on App Connect Dashboard.
- Click
Managetab. - Scroll to the bottom of the page to
Sharing Outside of Cloud Foundry organizationsection. ClickCreate API Key. - Enter a name under
Descriptive namefield and clickCreate. API Portal Linkis populated with a link. Click on that link.- On the right hand side panel, click on
Try itlink. - Under
Parameters -> Data, enter the input data for rest service and clickCall Operation. - Scroll a little down and you should see response from the service. Response Code should be
200 OK.


- Navigate to App Connect dashboard.
- Click on the flow on App Connect Dashboard.
- Click
Managetab. - Scroll a little until you find
API Infosection. - Click
API Definitionthat is available on the right side of the page, to see the options. ClickExport JSON Fileand save the json file. This file is needed by API Connect to invoke requests to App Connect flows.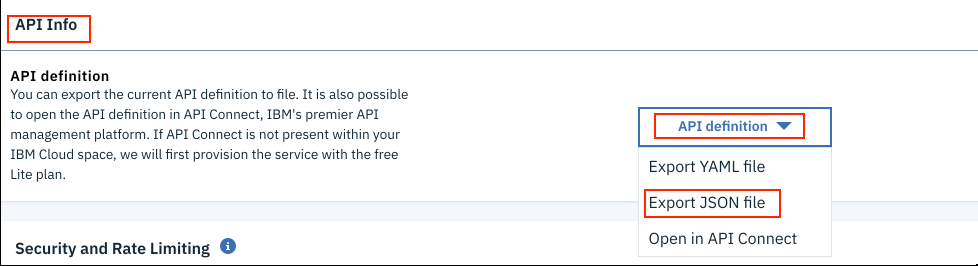

Note the end point url on API Connect
- On the API Connect Dashboard, click on
Sandbox. - Click on
Settings. - Click on
Gateways. - Note the
Endpointurl.

Create API for OAuth
- On the API Connect Dashboard, click on
Drafts. - Click on
APIs - Click on
Addand selectImport API from a file or URL. - Click on
Or import from URL.... - Enter the url
https://raw.githubusercontent.com/IBM/microservices-using-apiconnect-and-appconnect/master/api-connect-resources/oauth_endpoint.yaml. - The design tab for the API opens. Click on
OAuth 2. - Scroll down to the
Authenticationsection. For theAuthentication URL, specify the login microservice url noted in theDeploy login microservicesection. - Click on
Saveicon.

Create API for Funds Transfer
We will use the file exported in the step Export the App Connect Flow Rest interface earlier.
- On the API Connect Dashboard, click on
Drafts. - Click on
APIs - Click on
Addand selectImport API from a file or URL. - Click on
Browseand select the file exported earlier from App Connect interface. - Click on
Import. - The design tab for the API opens. Click on
Security Defintions. - Click on
+and selectOAuthto create a new OAuth definition. - Scroll down to
Flowsection. SelectAccess code. - For
Authorization URLenter the following URL - `http://[the end point url for API Connect noted earlier]/oauth-end/oauth2/authorize'. - For
Token URLenter the following URL - `http://[the end point url for API Connect noted earlier]/oauth-end/oauth2/token'. - In the
Scopessection, click on+to add a new scope. - Enter
funds_transferfor the name. - Enter a description
- Scroll down to the
Securitysection. Select the newly createdOAuthdefinition. The scopefunds_transferwill get automatically selected. - Click on
Saveicon.

Note the funds transfer endpoint url
On the funds transfer Design page:
- Click on
Base Pathand note the base path. - Click on
Pathsand note the path. The funds transfer api endpoint url is [End point url for API Connect noted earlier]/[Base Path]/[Path].
It should look like - https://api.au-syd.apiconnect.appdomain.cloud/.../sb/Z1ZFXl/Fund_Transfer.

Create a product and publish
Go to Drafts and select Products.
- Click on
Add + New Product. - Enter
Title,NameandVersion. ClickCreate. - The
Designpage opens. - On the
Designpage, selectAPIs. - Click on
+to add APIs. - Select both
OAuth endpointAPI andFunds TransferAPI. - Click on
Saveicon. - Click on
Stageicon and selectSandbox. - Go to
Dashboard. - Click on
Sandbox. - Click on the staged product.
- Select
Publishfrom the menu. - On the
dialogthat appears, click onPublishto publish the product.

Create an app on developer portal
- On the
Sandboxdashboard, click onSettings. - Click on
Portal. - Click on the
Portallink. - On the portal page, click on
Create an account. - Enter all the details and click
Create new account. - Activate the account using the sent email.
- Login to the portal with the chosen username and password. Click
Log-in. - Click on
Apps. - Click on
Create an App. - Enter the
TitleandDescription. For theOAuth Redirect URI, enter http://[Node RED Base URL noted earlier]/client. - Click
Submit. - Note the
Client IDgenerated for the createdApp.

Subscribe to a plan
On the developer portal, click on API Products.
- Click on the product that we created earlier.
- Click on
Subscribeto subscribe to the default plan.

Import the Node-RED flow and deploy
The Node-RED flow is available at: https://raw.githubusercontent.com/IBM/microservices-using-apiconnect-and-appconnect/master/client-app/node-red-flows/flows.json
- Copy the raw contents from https://raw.githubusercontent.com/IBM/microservices-using-apiconnect-and-appconnect/master/client-app/node-red-flows/flows.json to the clipboard.
- Go to the Node-RED flow editor.
- Select
Importand thenClipboardfrom menu. - Paste the copied contents.
- Click on
Import. - Click on
Deployto deploy the Node-RED flow.

Configure the application
Go to the URL: http://[Node-RED base url noted earlier]/configureui.
Enter all the details and click Configure.

As mentioned in step 5, a set of user credentials and bank account details are pre-defined in Mongo DB.
Following are the users details (already saved in db):
   {_id: "user1", password: "user1"}
   {_id: "user2", password: "user2"}
   {_id: "user3", password: "user3"}
Predefined accounts details are:
   {_id: "121", accountholder: "John", funds: 25000}
   {_id: "122", accountholder: "Tim", funds: 15000}
   {_id: "123", accountholder: "Joseph", funds: 250000}
   {_id: "124", accountholder: "Mary", funds: 200000}
These users and account details can be used to use/test the application.
Launch the application URL :
https://<Node-RED base url noted earlier>/login
- Enter username and password
- Click
Allow Accesson the pop-up. The OAuth based authorization uses thepublic access codescheme. - Choose option -
Transfer funds to another account. - Enter all the details for transfer.
- Click
Transfer.

- Securing an API by using OAuth 2.0
- Introduction to App Connect on Cloud https://developer.ibm.com/integration/docs/app-connect/
- OpenAPI APIs https://developer.ibm.com/integration/docs/app-connect/how-to-guides-for-apps/use-ibm-app-connect-openapi/
- Creating flows for APIs https://developer.ibm.com/integration/docs/app-connect/tutorials-for-ibm-app-connect/creating-flows-api/
- Calling API in a flow https://developer.ibm.com/integration/docs/app-connect/creating-using-apis/calling-apis-flow/
- Toolbox flow https://developer.ibm.com/integration/docs/app-connect/toolbox-utilities/adding-conditional-logic-flow/
This code pattern is licensed under the Apache Software License, Version 2. Separate third-party code objects invoked within this code pattern are licensed by their respective providers pursuant to their own separate licenses. Contributions are subject to the Developer Certificate of Origin, Version 1.1 (DCO) and the Apache Software License, Version 2.