Last Update Date: Sep 12 2021
This repository includes:
- The UDP-based real-time TI mmWave radar data capture code of mmMesh system.
- The code for the point cloud generation from binary file of mmWave radar (Note that the binary file should not have packet head).
- The Pytorch implementation of mmMesh deep model.
The structure of the repository is listed as following:
├── 0.preliminary
│ └── extract_SMPL_model.py
├── 1.mmWave_data_capture
│ ├── capture.py
│ ├── steaming.py
│ └── DataCaptureDemo_1843new.lua
├── 2.point_cloud_generation
│ ├── configuration.py
│ └── pc_generation.py
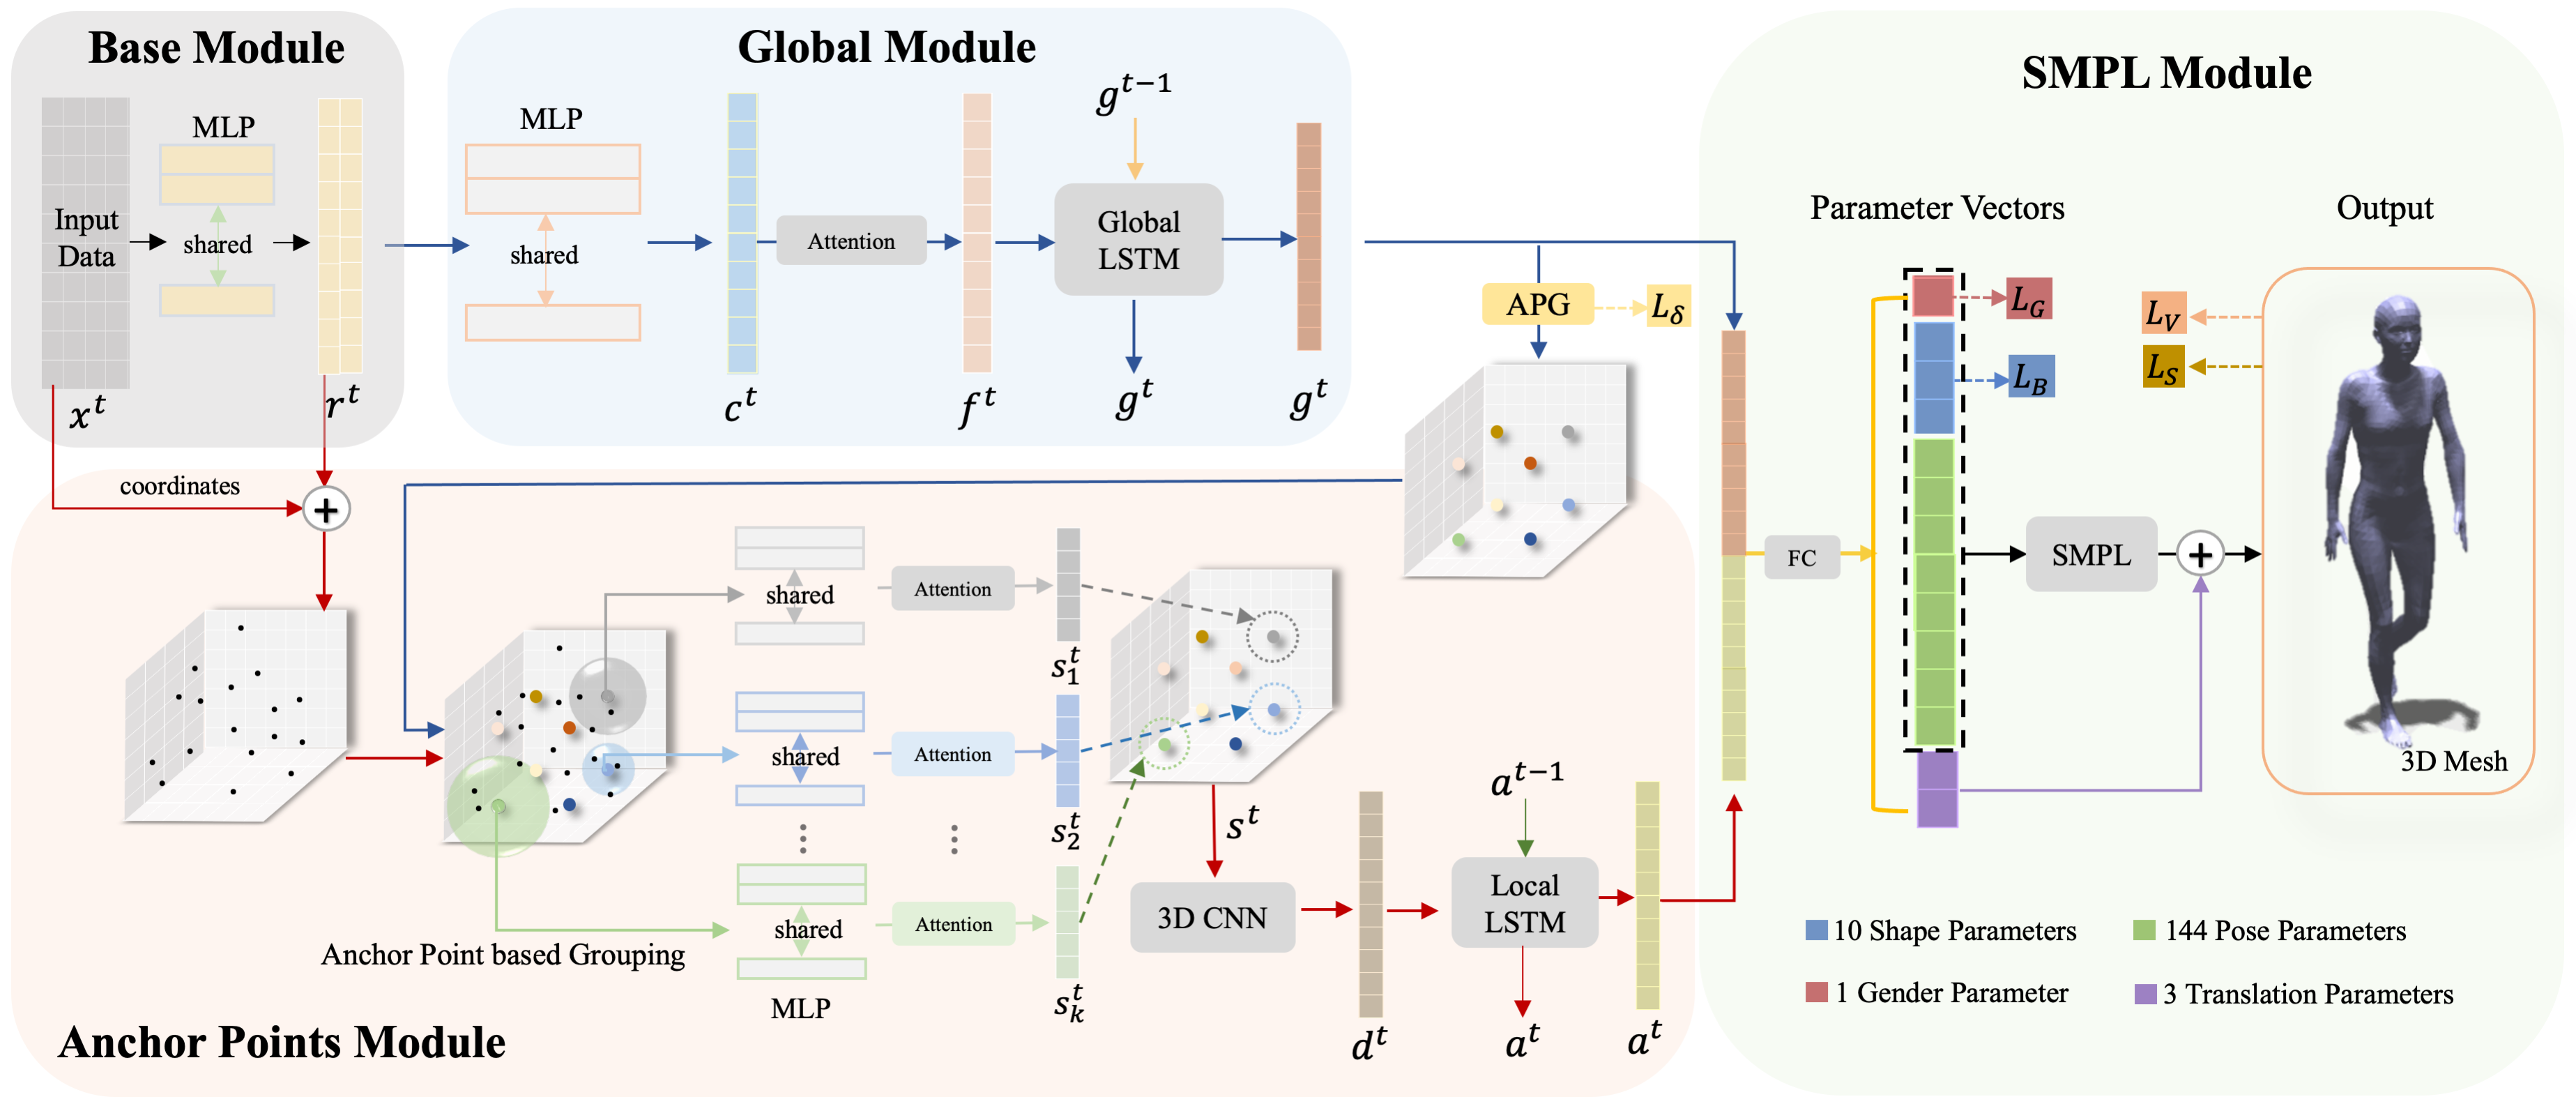
├── 3.deep_model
│ ├── data.py
│ ├── infer_model.py
│ ├── network.py
│ ├── smpl_utils_extend.py
│ └── train_model.py
├── HISTORY.md
├── LICENSE
├── README.md
└── .gitignore
Due to the copyright issue, the SMPL model file cannot be provided. You need to access https://smpl.is.tue.mpg.de/ to access the SMPL model download page. Then, dowload the model package: version 1.0.0 for Python 2.7 (10 shape PCs) and extract the file. You need to use extract_SMPL_model.py (use Python 3 to run the code) in 0.preliminary to generate SMPL model used in the training of mmMesh. For example, if you extract the file in the same folder with extract_SMPL_model.py, you can use:
python extract_SMPL_model.py ./SMPL_python_v.1.0.0/smpl/models/to generate two files: smpl_f.pkl and smpl_m.pkl. Note: you need to install Chumpy to run the code.
To enable real-time data capturing, the first step is to start the radar in Windows. The softwave used in the paper is mmWave Studio 2.0.0.2. Just load DataCaptureDemo_1843new.lua and click the Run! button on the left bottom corner of the softwave as show in the image.
 Then the radar will keep sending the chirps and steaming the data through networking cables.
Then, change the operating system of the computer to Ubuntu, or unplug the cable on the Windows machine (you used to start the radar) and connect the cable to a Ubuntu machine. (Note: all the Python files are executed on a Ubuntu machine during our experiments.)
In Ubuntu, you will use steaming.py. The methods in the class will automatically collect the packets from the radar and assemble them into frames. It also allows you to access these frames using getFrame method. As an example, if you want to capture the data from the mmWave radar for 5 mins and store them, just run:
python capture.py 5The methods in pc_generation allows you to generate the point cloud from the binary mmWave radar.For example, if you want to generate the point cloud data from test.bin for 10 frames, try:
python pc_generation.py test.bin 10Note: to successfully read the data from the binary file, you should change the radar configuration to generate the binary file without the packet head.
Model training:
python train_model.pyModel inference:
python infer_model.pyNote: to run the code, you need to move the smpl_f.pkl and smpl_m.pkl generated in step 0.Preliminary to the current folder.
If you find our work useful in your research, please cite:
@inproceedings{xue2021mmmesh,
  title={mmMesh: towards 3D real-time dynamic human mesh construction using millimeter-wave},
  author={Xue, Hongfei and Ju, Yan and Miao, Chenglin and Wang, Yijiang and Wang, Shiyang and Zhang, Aidong and Su, Lu},
  booktitle={Proceedings of the 19th Annual International Conference on Mobile Systems, Applications, and Services},
  pages={269--282},
  year={2021}
}- The Pytorch version of SMPL code is partly borrowed from https://github.com/CalciferZh/SMPL.
- The grouping code of point cloud in the Anchor Point Module is partly borrowed from https://github.com/yanx27/Pointnet_Pointnet2_pytorch