
![]()

Modern Java/JVM Build Practices is an article on building modern Java/JVM projects with samples for Gradle and Maven. The focus is on best build practices and project hygiene.
There are two recurring themes:
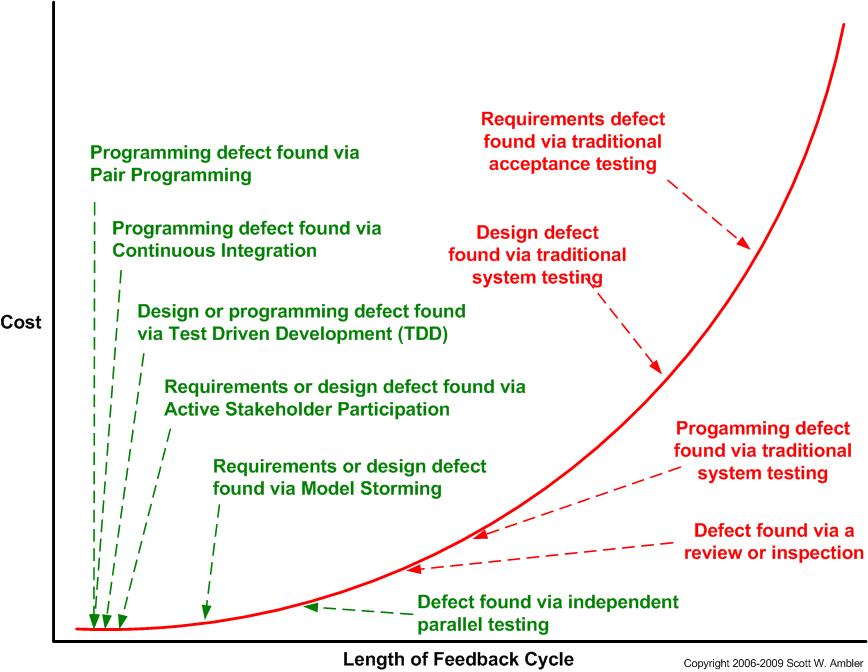
- Shift problems left — Find issues earlier in your development cycle through the build before they happen to you in production
- Make developer life easier — Automate build tasks commonly done by hand: get your build to complain (fail) more often outside of typing code
Summing up the goals:
- I'm not a great programmer; I'm just a good programmer with great habits. — Kent Beck
- Make it work, make it right, make it fast — C2 Wiki
A key goal of this project is to be reuseable. It should be a good starting point for new projects, and advise on updating your existing project.
This is you! Become a programmer with great habits.
After cloning this project on your machine:
$ ./gradlew build  # Local build experience
# Output ommitted
$ ./batect build-with-gradle  # Reproduce locally what CI does
# Output ommitted
$ ./mvnw verify  # Local build experience
# Output omitted
$ ./batect build-with-maven  # Reproduce locally what CI does
# Output ommitted
$ ./run-with-gradle.sh
$ ./run-with-maven.shNB — This is a living document. The project is frequently updated to pick up new dependency versions and improved practices; this README updates recommendations. This is part of what great habits looks like. See Reusing this project for tips on pulling in updates.
Please file issues, or contribute PRs! I'd love a conversation with you.
- Consider Clone git repository without
history?
to start at the current tip of this project. For example, some images in
README.mdstarted overlarge in earlier versions, something you may not want in a clone. - Caution: Not all the images used in
README.mdmay be in the Public Domain (this is challenging to research). Do due diligence before sharing your clone, and other licenses may apply for these images in a global context

- Introduction
- Reusing this project
- You and your project
- Getting your project started
- The JDK
- Use Gradle or Maven
- Setup your CI
- Keep local consistent with CI
- Maintain your build
- Choose your code style
- Generate code
- Leverage the compiler
- Use linting
- Use static code analysis
- Shift security left
- Leverage unit testing and coverage
- Use mutation testing
- Use integration testing
- Going further
- Problems
- Credits
Hi! I want you to have awesome builds 🟢. If you're on Java project, or a project on any JVM language (Clojure, Groovy, JRuby, Java, Jython, Kotlin, Scala, et al), this article is for you. This article assumes you are using Gradle or Maven for your build locally, and in CI. Some of you are using other build systems native to your source language. Please follow along!
What is the goal of this article? I want to highlight modern practies in building Java/JVM projects with Gradle or Maven, and provide guidance, or at least food for thought. The sample Gradle and Maven projects use Java, but most recommendations apply to builds for any JVM language. I'll never be as clever or as talented as why the lucky stiff, but I hope this writing helps you have a JVM build that makes you, developers, and others happy.
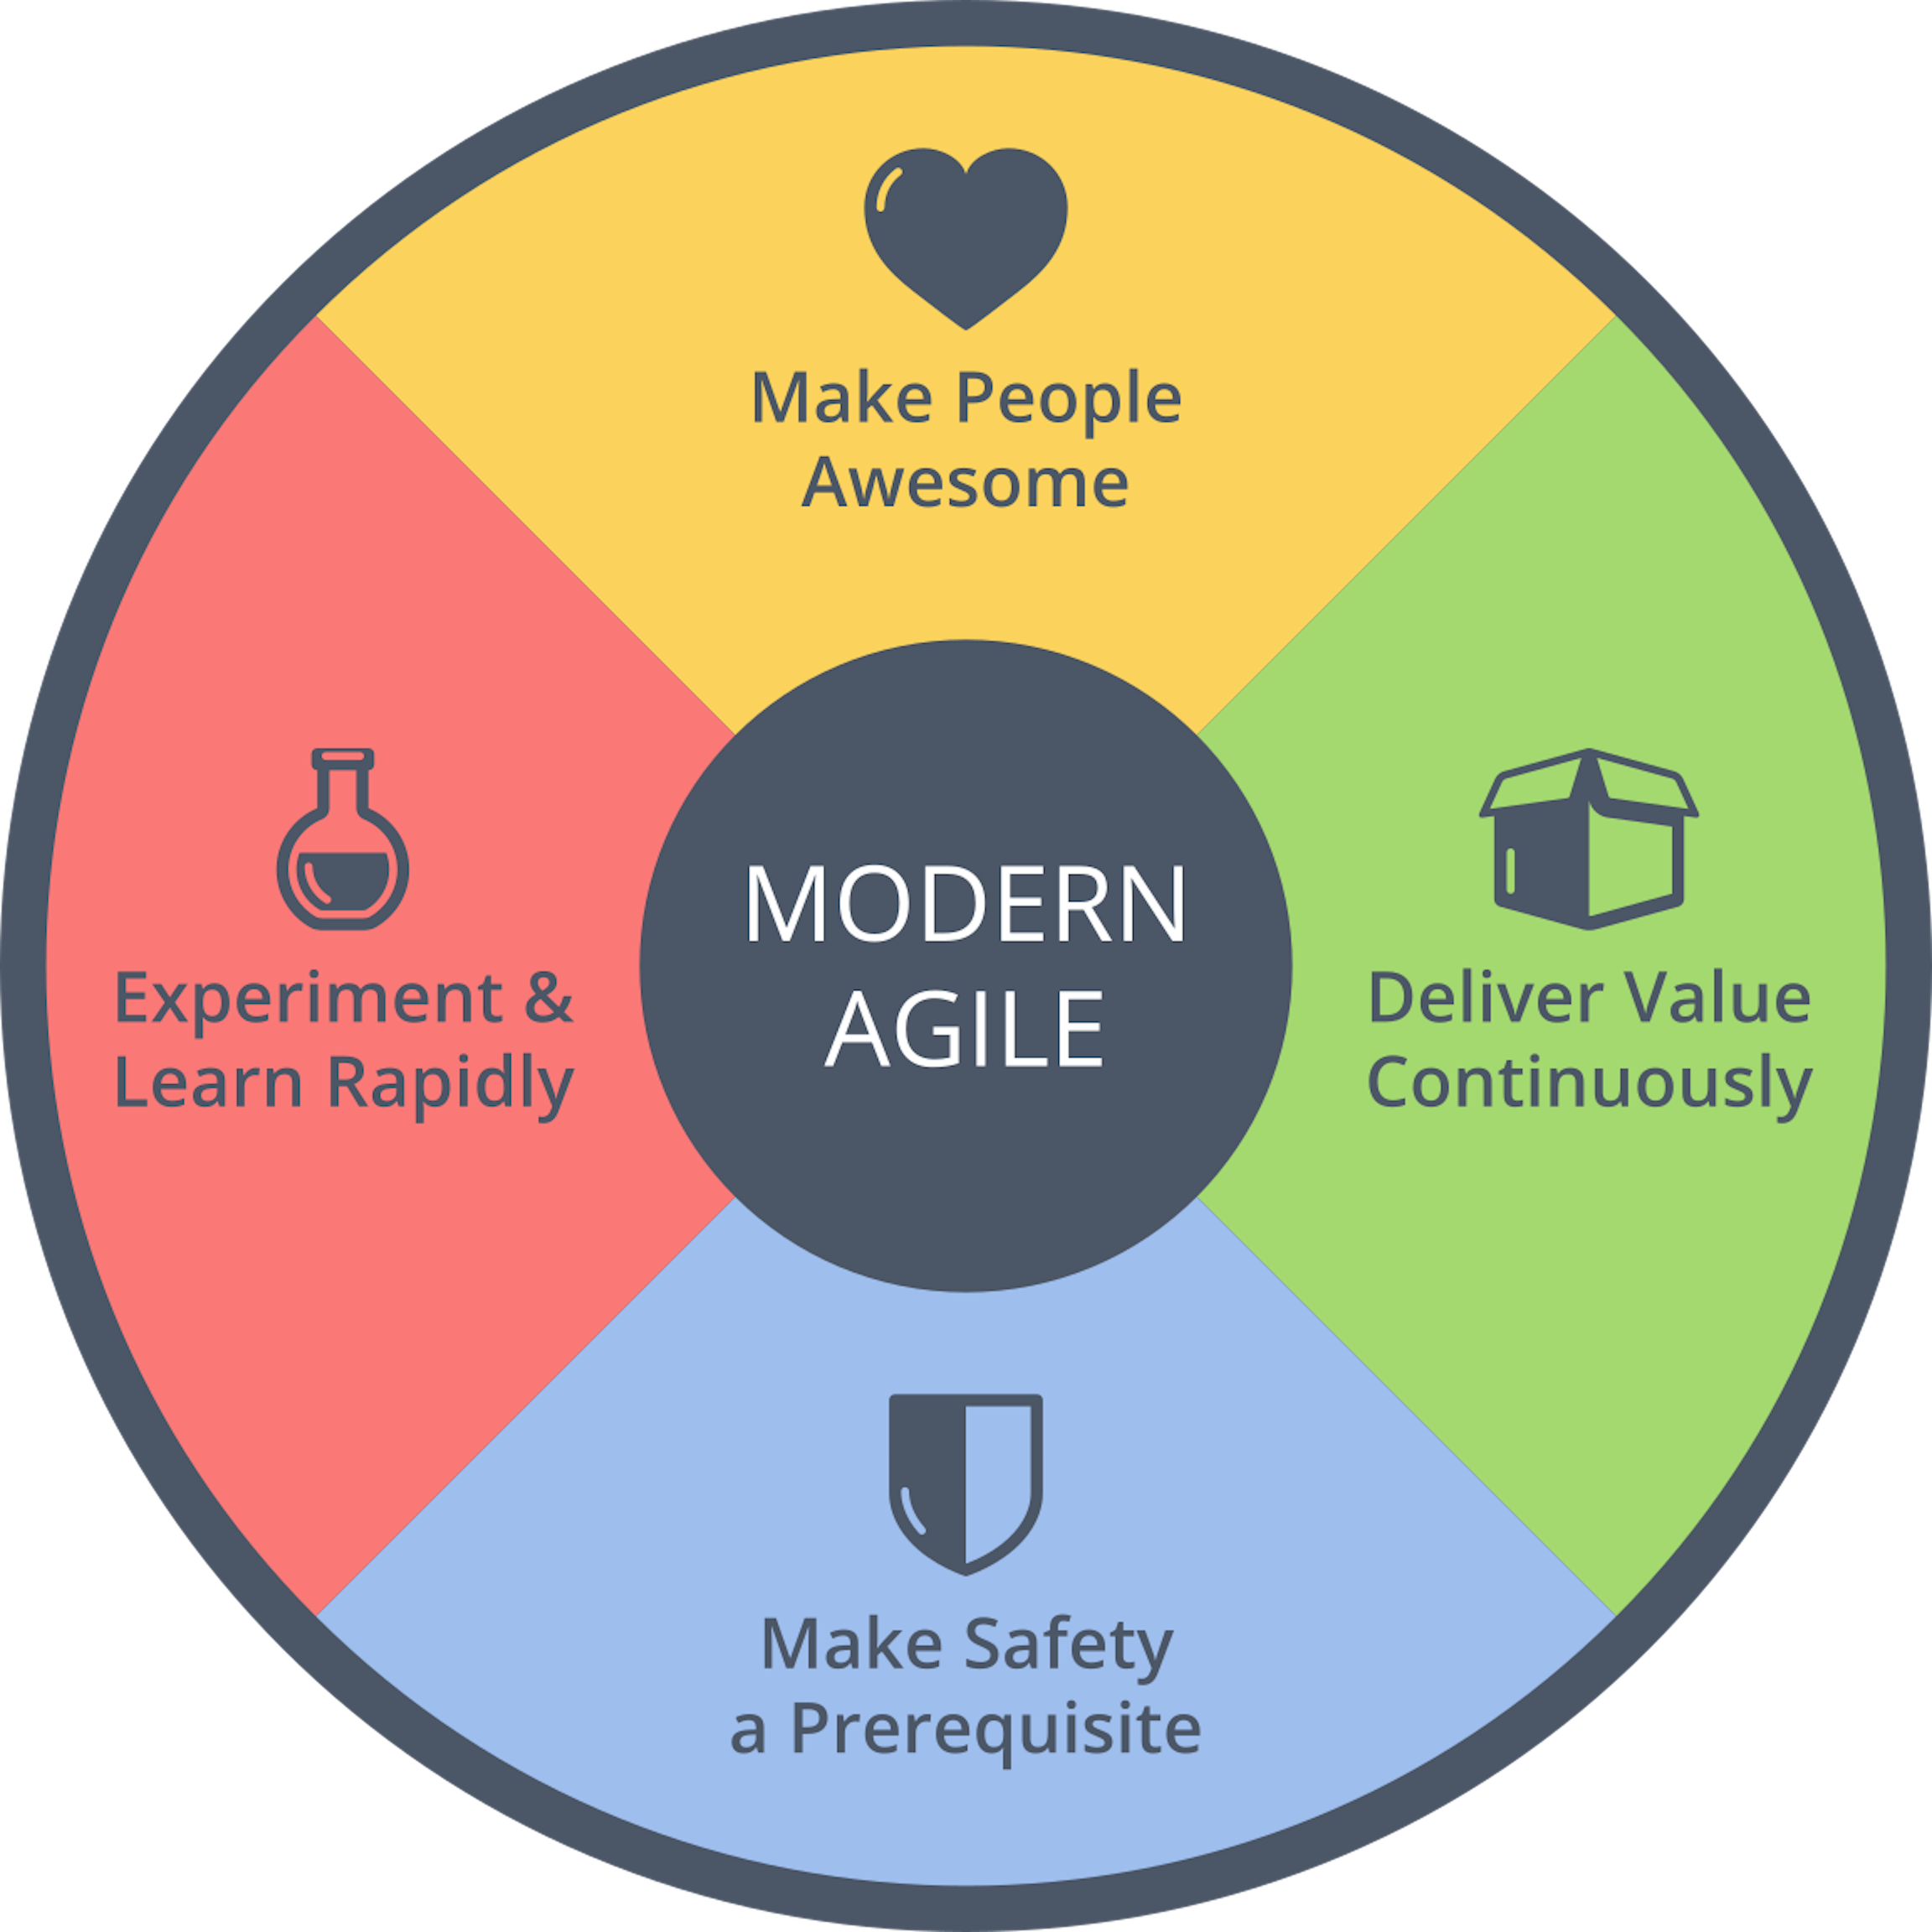
See the wheel to the right? No, you do not need to be agile! (But I encourage you to explore the benefits of Agile.) This article is for you regardless of how your team approaches software. The point is to "make people awesome" for any project, possibly the most key value of the Agile approach to software.
- Make it work
- Can I as a Day 1 developer build the project locally?
- Can I hand the project off to someone else to try?
- Make it right
- Can I reproduce issues in the CI build, and fix it locally?
- Can I find code and security issues from running the build?
- Is the code clean? Am I happy to explore the project?
- Make it fast
- Can I run the local build as frequently as I like, and be productive?
- Can I have a fast cycle of code & test? What about red-green-refactor?
- Can I update my dependencies and plugins quickly and easily?
- Starter build scripts for Modern Java/JVM builds in Gradle and Maven, helpful for new projects, or refurbishing existing projects
- Quick solutions for raising project quality and security in your local build
- Shift problems to the left ("to the left" meaning earlier in the development cycle). You'll get earlier feedback while still having a fast local build. Time spent fixing issues locally is better than waiting on CI to fail, or worse, for production to fail
- The article focuses on Gradle and Maven: these are the most used build tools for Modern Java/JVM projects. However, if you use a different build tool, the principals still apply
I want to help with the question: I am at Day 1 on my project: How do I begin with a local build that is supports my team through the project lifetime? And when I have an existing project, how to I catch up?
Make people awesome (that means you). This project is based on lots of experience and experiments with Modern Java/JVM builds, and shares with you lessons learned.

Don't forget to fork me! (No, really, this is Public Domain software. This project is meant to be reused by you however is sensible.)
Two sensible approaches:
- Clone this project to a new repository, and work from there, especially if starting a new project
- Read through this repositories's code, and update your own repository by hand, especially for applying advice to an existing respository
If you cloned this project as a starter, you may want to stay updated on improvements:
git remote add upstream https://github.com/binkley/modern-java-practices.git
git fetch upstream
git merge master/upstream
Once you are happy with your project, you should think about removing the upstream remote, and reviewing changes in this repository by hand. Your decision might depend on what merge conflicts you encounter.
There are simple ways to make your project great. Some goals to strive for:
- Visitors and new developers get off to a quick start, and can understand what the build does (if they are interested)
- Users of your project trust it—the build does what it says on the tin—, and they feel safe relying on your project
- You don't get peppered with questions that are answered "in the source" —because not everyone wants to read the source, and you'd rather be coding than answering questions ☺
- Coding should feel easy. You solve real problems, and do not spend overmuch much time on build details: your build supports you
- Your code passes "smell tests": no simple complaints, and you are proud of what others see. Hey! You're a professional, and it shows. (This is one of my personal fears as a programmer)
- Your project is "standard", meaning, the build is easily grasped by those familiar with standard techniques and tooling
Hopefully this article and the sample build scripts help you!
To get a project off to a good start, consider these items. Even for existing projects, you should address these as you go along or while refurbishing an existing project:
- Team agreement comes first. Make sure everyone is onboard and clear on what build standards are, and understands—at least as an outline—what the build does for them
- Provide a good
README.md. This saves you a ton of time in the long run. This is your most important step. A good resource is Yegor's Elegant READMEs- Intelligent laziness is a virtue. Time invested in good documentation pays off
- A good
README.mdanswers visitors questions, so you don't spend time answering trivial questions, and explains/justifies your project to others. - Fight Conway's Law with communication!
- Pick a version of Java, and stick to it throughout your local build, CI pipeline, and environment deployments. Do not mix versions.
- Pick Gradle or Maven, and use only one. This project provides both to demonstrate equivalent builds for each. See Use Gradle or Maven for more discussion
- Use build wrappers committed into your project root. These run Gradle or
Maven, and coders should always invoke
./gradlewor./mvnw(use shell aliases if these grow tiresome to type)- Build wrappers are shell scripts to run Gradle or Maven. The wrapper takes care of downloading needed tools without getting in the way. New contributors and developers can start right away; they do not need to install more software
- For Gradle, use
./gradlew(part of Gradle) - For Maven, use
./mvnw(in progress with Apache to bundle as part of Maven)
- Always run CI on push to a shared repository. It's a sad panda when someone is excited about their commit, and then the commit breaks the other developers
- Pick a common code style, and stay consistent; update tooling to complain on
style violations
- The team should agree on a common code style, eg, SUN, Google, et al
- See Use linting
-
Consider using client-side Git hooks for
pre-pushto run a full, clean, local build. This helps ensure "oopsies" from going to CI where they impact everyone. The options are broad. Try web searches on:- "gradle install git hooks"
- "maven install git hooks"
This article presently has no specific recommendations on choices of plugin or approach for Git hooks.

For any Modern Java/JVM project, the first decision is which version of Java (the JDK) to use? Some guidelines:
- Java 17 is the most current LTS ("long-term support") version
- There are more recent versions (12 to 16) with continuing improvements and additional features to try out. However Oracle provides no paid support for these versions. These versions, however, are production-worthy
- If your personal or open-source project does not require a paid support contract, newer Java versions are a good choice
- For Java 8 or older: These versions are no longer supported by Oracle unless one buys a paid support contract . However, Adoptium (formerly AdoptOpenJDK) provides distributions of OpenJDK 8, and community support until at least May 2026 with commercial support available from IBM
In this project, you'll see the choice of Java 17 as this is the version to recommend in production.
In general, you will find that Adoptium is a go-to choice for obtaining the JDK.
- In Maven, use a property to fix the version of Java in place. But note
naming for that property:
java.versionis defined by the JVM, and Maven creates a matching property. Recommended is to define your Java version with thejdk.versionproperty, which has no collision with pre-defined properties.
Two best-of-class tools come to mind to manage your JDK environment in projects:
Both assume UNIX-type shells (Bash, Zsh, etc).
For those on Windows, you may need to use Cygwin, Git for Windows, or WSL2 to use these.
(Reminder: in general, when setting up your project environment, prefer the latest LTS version of Java, which is 17.)
jEnv supports both "global" (meaning you, the user)
and "project" choices of JDK (particular to a directory and its children) in
which JDK installation to use. You may notice the
.java-version file: this is a per-project file for jEnv to
pick your project Java version.
Do use jenv enable-plugins export and restart your shell. This ensures
JAVA_HOME is exported to match your jEnv settings. Several tools use
JAVA_HOME rather than the java or javac found in your PATH.
You may also find the gradle and maven plugins for jEnv useful.
There are many ways to install the JDK, most are platform-dependent. In general, your team will be better off using a "managed" approach, rather than with each person using binary installers. Popular choices include:
- Apt and friends for Linux or WSL
- Homebrew for Mac
- SDKMAN for multiple platforms
direnv is more general. Rather than specifying a Java
version, you edit a .envrc file and add JDK-specific environment settings
(and another other environment settings) just as you would on the command-line.
Typically set are PATH to find java and javac programs, and JAVA_HOME.


The choice between Gradle and Maven depends on your team, your broader ecosystem, and your project needs. In summary:
-
Gradle — your build script is written in Groovy or Kotlin; dynamic, imperative, and mutable; requires debugging your build on occasion, but less verbose than Maven's XML. Use of "parent" (umbrella) projects is possible but challenging. You can locally extend your build script either inline with build code, with project plugins, or with plugins from a separate project (perhaps shared across project for your team). If interested in custom plugins, read more here
-
Maven — your build scripts is written in XML; declarative and immutable; verbose but specific; it either works or not. Use of "parent" (umbrella) projects is simple with built-in support. You can locally extend your build with plugins from a separate project (perhaps shared across project for your team). If interested in custom plugins, read more here
For Modern Java/JVM projects, use Gradle or Maven. The article doesn't cover alternative build tools: industry data shows Gradle or Maven are the build tools for most folks. Unless you find yourself in a complex monorepo culture (Google, etc), or there are mandates from above, you need to select one of Gradle or Maven. However, for projects not using Gradle or Maven, you will still find improvements for your build herein (though details will differ).
For new projects, you may find Spring Initializr,
mn from Micronaut, or
JHipster, among many other project starters, more
to your liking: they provide you with starter Gradle or Maven scripts specific
for those frameworks. That's great! This article should still help you improve
your build beyond "getting started". You should pick and choose build features
to add to your starter project, whatever makes sense for your project.
This article offers no preference between Gradle or Maven. You need to decide with your team. After picking your build tool, you might rename run-with-gradle.sh or run-with-maven.sh to just "run.sh". run-with-generic-build-tool.sh is provided as an example of supporting both tools in the same project, and to give you ideas on a runscript. These scripts assume Java is your language. See run-with-generic-build-tool.sh for an example of working with Java and Kotlin in the same project.
Projects using Ant should migrate. It is true that Ant is well-maintained (the latest version dates from September 2020). However, you will spend much effort in providing modern build tooling, and effort in migrating is repaid by much smaller work in integrating modern tools. Data point: consider the number of Stackoverflow posts providing Gradle or Maven answers to those for Ant. Consider Ant builds no longer well-supported, and a form of Tech Debt.
Throughout, when covering both Gradle and Maven, Gradle will be discussed first, then Maven. This is no expressing a preference! It is neutral alphabetical ordering.
- Take advantage of your shell's tab completion:
- The sample Gradle and Maven build scripts often specify specific versions of the tooling, separate from the plugin versions. This is intentional. You should be able to update the latest tool version even when the plugin has not yet caught up
- Gradle itself does not provide support for "profiles", a key Maven feature.
This is different from profiling build performance! Maven profiles
can be used in many ways. The most common are to enabling/disabling build
features on the command line, tailoring the build to a particular deployment
environment, or using different credentials for other systems. If this
feature is important for your team, you can code
if/elseblocks directly inbuild.gradle, or use a plugin such as Kordamp Profiles Gradle plugin (Kordamp has a suite of interesting Gradle plugins beyond this one; read more on that page) - Gradle uses advanced terminal control, so you cannot always see what is
happening. To view Gradle steps plainly when debugging your build, use:
or save the output to a file:
$ ./gradlew <your tasks> | cat
$ ./gradlew <your tasks> | tee -o some-file
- If your source code is in Kotlin, so should be your build. Gradle provides a Kotlin DSL for build scripts as a first-class counterpart to the traditional Groovy DSL
- Maven colorizes output, but does not use terminal control to overwrite output
- See Setup your CI for another approach to getting plain text console output
- The Maven Notifier may be to your liking
- If you like Maven, but XML isn't your thing, you might explore the Polyglot for Maven extension which provides the POM in multiple languages/formats (eg, Ruby, YAML, many others)
- If you have a multi-module Maven build, you might consider Takari Smart Builder to speed it up
- Maven best practice is to specify the version for each plugin, even default plugins that come with your version of Maven. This enforces reproducible builds. See also the Maven Enforcer Plugin to exactly specify the version of Maven for your build
Your CI is your "source of truth" for successful builds. Your goal: Everyone trusts a "green" CI build is solid.
When using GitHub, a simple starting point is
ci.yml. (GitLabs is similar, but as this
project is hosted in GitHub, there is not a simple means to demonstrate CI at
GitLabs). This sample GitHub workflow builds with Gradle, and then with Maven.
If you use GitLab, read about the equivalent in GitLab CI/CD, or for Jenkins in Pipeline.
When publishing your project, consider Publishing Java packages with Maven for GitHub, or equivalent for other CI systems. Do not publish from local builds. For GitHub, note the limitations of Download from Github Package Registry without authentication.
- A simple way in CI to disable ASCII control sequences from colorizing or
Gradle's overwriting of lines (the control sequences can make for hard-to-read
CI logs) is to use the environment setting:
This does not make sense for local builds, and your CI system (eg, GitHub) may manage this already
TERM=dumb
- With Gradle, use the
--warning-mode=allflag for CI: this shows all warnings Gradle generates, not just a summary. See Showing or hiding warnings for details - With Maven, use the
--no-transfer-progressflag for CI: this avoids spamming CI logs with download progress messages
Batect is a solid tool from Charles Korn. It runs your build in a "CI-like" local environment via Docker. This is one of your first lines of defence against "it runs on my box". (Compare Batect with other tools in this space.)
Earthly shares philosophy with Batect and with a different approach to implementation. They are both good choices.
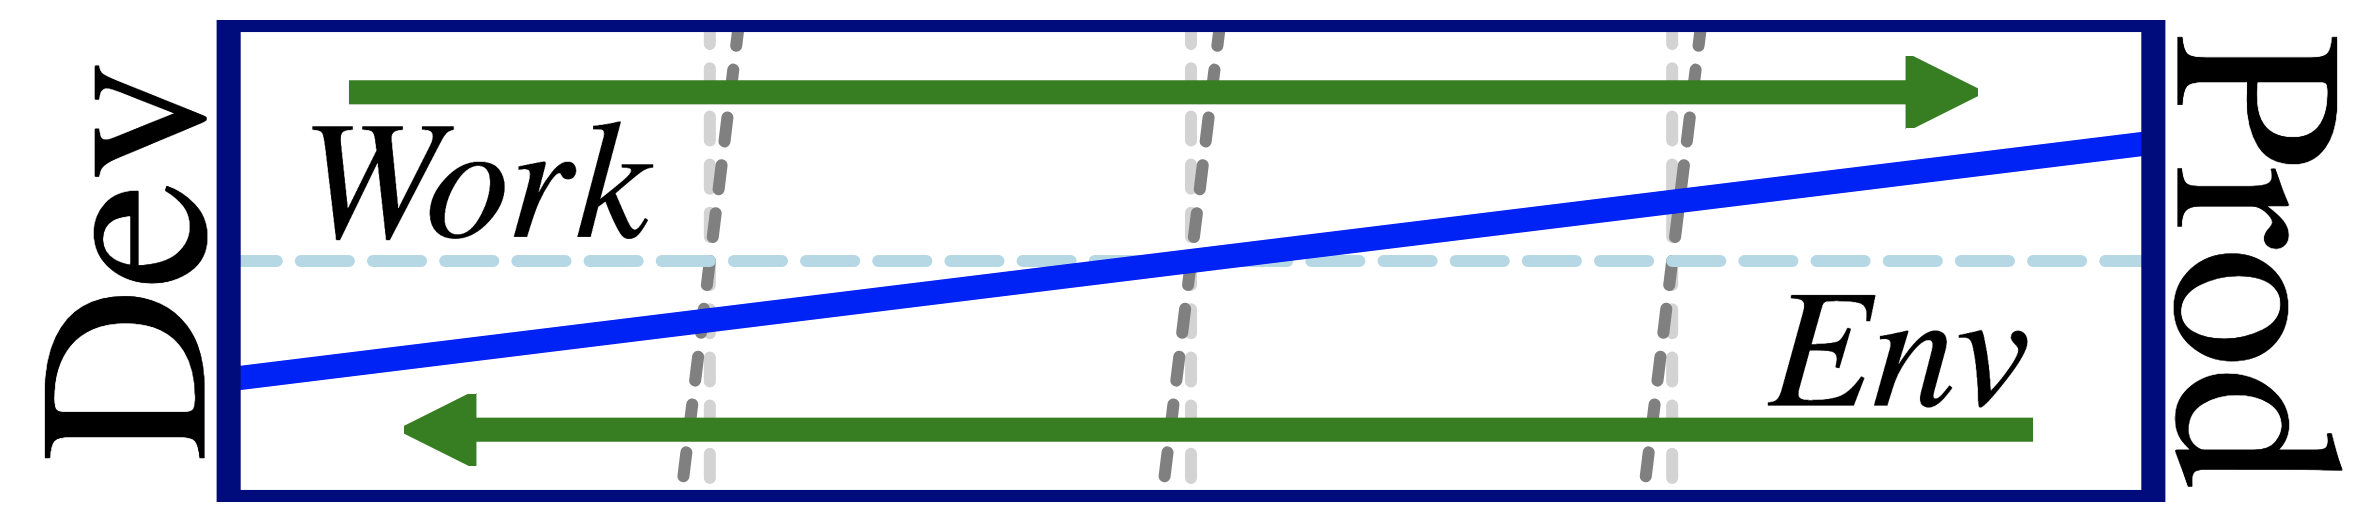
This is an important step! It is closer to your CI builds locally. You should strive to keep local as faithful as possible to CI and Production.
You may decide not to use CI-like tooling for local builds. However, consider that use of them raises your confidence that CI will succeed. Local CI-like tooling is part of the theme of shifting left for problems.
See Working with CI systems for documentation on using Batect from within a dockerized CI environment.
NB — to be as consistent as possible, the sample
ci.yml for GitHub uses Batect for the Gradle and
Maven builds, and batect.yml for Batect pulls an image
for AdoptOpenJDK17. So ci.yml does
not setup JDK 17 directly, but relies
on Batect.
Configure your local CI in batect.yml with suitable tasks. For
this project, there are example tasks:
$ ./batect -T
Available tasks:
- build-with-gradle: Build and test with Gradle
- build-with-maven: Build and test with Maven
Other common tasks might be:
$ ./batect -T
Available tasks:
[ ... ]
- shell: Open a shell in the containerIt is helpful that your batect.yml calls Gradle with the --no-daemon flag:
- There is no point in spinning up a daemon for a Docker ephemeral container
- With a daemon, the Docker container's Gradle may be confused by
~/.gradle/daemonand/.gradle/workersdirectories mounted by Batect from your home directory, as these refer to processes in the host, not the container (batect.ymlmounts your~/.gradleto include caches of already-downloaded dependencies, et al) - If you encounter troubles, run locally
./gradlew --stopto kill any local daemons: This indicates a bug, and "stop" is a workaround. See a suggestion of a better approach .
-
If you encounter issues with Gradle and Batect, try stopping the local Gradle daemons before running Batect:
$ ./gradlew --stop
$ ./batect <your Batect arguments>
-
The Batect builds assume you've run local builds first. Plesae run
./gradlew buildor./mvnw verifyat least once before running./batect ...to ensure cached/shared downloads are present -
In CI, use the
--permanently-enable-telemetryflag to avoid CI asking a "Y/N" question. This must be separate step from running the build itself. Seeci.ymlfor Gradle and Maven examples

Treat your build as you would your codebase: Maintain it, refactor as needed, run performance testing, et al.
What does your build do exactly, and in what order? You can ask Gradle or Maven to find out:
- Gradle Task Tree plugin
with
./gradlew some...tasks taskTree - Maven Buildplan plugin
with
./mvnw buildplan:list(see plugin documentation for other goals and output format)
Each of these have many options and features, and are worth exploring.
Let tools tell you when you have dodgy dependencies, or an inconsistent setup.
For example, leverage jdeps which
comes with the JDK
. Jdeps spots, for example, if you have a multi-version jar as a dependency that
does not include your JDK version (an example of this may be is JUnit), or if
your code depends on internal (non-public) classes of the JDK
(important expecially when using the JDK module system).
The Kordamp plugin used for Gradle does not fail the build when jdeps errors, and only generates a report text file. See this issue.
It is frustrating for local devs when something horrible happened during the build (say a production with "ERROR" output during a test), but:
- The build is GREEN, and developers should trust that
- There is too much output in the local build, so developers don't spot telltale signs of trouble
There are many approaches to this problem. This project uses JDK logging as
an example
, and keeps the build quiet in
config/logging.properties.
In CI, this is different, and there you want as much output as possible to diagnose the unexpected.
TODO This section is under construction. I'm still spiking best practices for quiet local builds and noisy CI builds.
An important part of build hygiene is keeping your build system, plugins, and dependencies up to date. This might be simply to address bug fixes (including bugs you weren't aware of), or might be critical security fixes. The best policy is: Stay current. Others will have found—reported problems—, and 3rd-parties may have addressed them. Leverage the power of Linus' Law ("given enough eyeballs, all bugs are shallow").
- Gradle
- Maven
- Team agreement on release updates only, or if non-release plugins and dependencies make sense for your situation
- Each of these plugins for Gradle or Maven have their quirks. Do not treat them as sources of truth but as recommendations. Use your judgment. In parallel, take advantage of CI tooling such as Dependabot (Github) or Dependabot (Gitlab)
An example use which shows most outdated plugins and dependencies (note that one
Maven example modifies your pom.xml, a fact you can choose or avoid):
$ ./gradlew dependencyUpdates
# output ommitted
$ ./mvnw versions:update-properties  # Updates pom.xml in place
$ ./mvnw versions:display-property-updates  # Just lists proposed updates
# output ommitted
This project keeps Gradle version numbers in
gradle.properties, and for Maven in
the POM, and you should do the same.
Since your pom.xml is in Git, versions:update-properties is safe as you
can always revert changes, but some folks want to look before doing.
- Gradle and Maven provide default versions of bundled plugins. In both built tools, the version update plugins need you to be explicit in stating versions for bundled plugins, so those versions are visible for update
- Enable HTML reports for local use; enable XML reports for CI use in integrating with report tooling
NB —
Dependabot
may prove speedier for you than updating dependency versions locally, and runs
in CI (GitHub) on a schedule you pick. It submits PRs to your repository when it
finds out of date dependencies. See
dependabot.yml for an example using a daily
schedule.
A similar choice is Renovate.
Your simplest approach to Gradle is to keep everything in build.gradle. Even
this unfortunately still requires a settings.gradle to define a project
artifact name, and leaves duplicate version numbers for related dependencies
scattered through build.gradle.
Another approach is to rely on a Gradle plugin such as that from Spring Boot to manage dependencies for you. This unfortunately does not help with plugins at all, nor with dependencies that Spring Boot does not know about.
This project uses a 3-file solution for Gradle versioning, and you should consider doing the same:
gradle.propertiesis the sole source of truth for version numbers, both plugins and dependenciessettings.gradleconfigures plugin versions using the propertiesbuild.gradleuses plugins without needing version numbers, and dependencies refer to their property versions
The benefits of this approach grow for Gradle multi-project projects, where you
may have plugin and dependency versions scattered across each build.gradle
file for you project and subprojects.
So to adjust a version, edit gradle.properties. To see this approach in action
for dependencies, try:
$ grep junitVersion gradle.properties setttings.gradle build.gradle
gradle.properties:junitVersion=5.7.0
build.gradle:    testImplementation "org.junit.jupiter:junit-jupiter:$junitVersion"
build.gradle:    testImplementation "org.junit.jupiter:junit-jupiter-params:$junitVersion"
To update Gradle:
$ $EDITOR gradle.properties  # Change gradleWrapperVersion property
$ ./gradlew wrapper  # Update
$ ./gradlew wrapper  # Confirm, and download new jar if needed
With Gradle, there is no "right" solution for hygienic versioning.
If you use the toolVersion property for a plugin to update the called tool
separately from the plugin itself, this is a convention, not something the
Gradle API provides to plugins. As a consequence, the Versions plugin is unable
to know if your tool version is out of date. An example is the JaCoCo plugin
distributed with Gradle.
Two options:
- Do not use the
toolVersionproperty unless needed to address a discovered build issue, and remove it once the plugin catches up to provide the tool version you need - Continue using the
toolVersionproperty, and as part of running./gradlew dependencyUpdates, manually check alltoolVersionproperties, and updategradle.propertiesas accordingly
NB — Maven handles this differently, and does not have this concern.
A fast local build is one of the best things you can do for your team. There are variants of profiling your build for Gradle and Maven:
- Gradle build scan with the
--scanflag - Maven profiler extension with
the
-Dprofileflag
Some shortcuts to speed up the red-green-refactor cycle:
- Just validate code coverage; do not run other parts of the build:
- Gradle:
./gradlew clean jacocoTestReport jacocoTestCoverageVerification - Maven:
./mvnw clean test jacoco:report jacoco:check
- Gradle:
- Both dependency vulnerability checks and
mutation testing
can take a while, depending on your project. If you find they slow your team
local build too much, these are good candidates for moving to
CI-only steps, such as a
-PCIflag for Maven (see "Tips" section of Use Gradle or Maven for Gradle for an equivalent). This project keeps them as part of the local build, as the demonstration code is short - See the bottom of
build.gradlefor an example of customizing "new" versions reported by the GradledependencyUpdatestask - The equivalent Maven approach for controlling the definition of "new" is to use Version number rules
- With the Gradle plugin, you can program your build to fail if dependencies are outdated. Read at Configuration option to fail build if stuff is out of date for details
Style is an often overlooked but very critical attribute of writing. The style of writing directly impacts the readability and understandability of the end product
There are 2 main java code styles
It is up to you which one you should choose. But the style should be chosen and the style should be the same for everyone.
To maintain the same standard config/ide/eclipse-java-google-style.xml
or intellij-java-google-style.xml should be imported to your IDE. Checkstyle
should be configured based on the chosen standard
When sensible, prefer to generate rather than write code. Here's why:
- Intelligent laziness is a virtue
- Tools always work, unless they have bugs, and you can fix bugs. Programmers make typos, and fixing typos is a challenge when not obvious. Worse are _ thinkos_; code generation does not " think", so is immune to this problem
- Generated code does not need code review, only the source input for generation needs review, and this is usually shorter and easier to understand. Only your hand-written code needs review
- Generated code is usually ignored by tooling such as linting or code coverage (and there are simple workarounds when this is not the case). Your hand-written code needs tooling to shift problems left
Note that many features for which in Java one would use code generation
(eg, Lombok's @Getter
or @ToString), can be
built-in language features in other languages such as Kotlin or Scala (eg,
properties
or data classes).
Lombok is by far the most popular tool in Java for code generation. Lombok is an annotation processor, that is, a library (jar) which cooperates with the Java compiler. (An introductory guide to annotations and annotation processors is a good article if you'd like to read more on how annotation processing works.)
Lombok covers many common use cases, does not have runtime dependencies, there are plugins for popular IDEs that understand Lombok's code generation, and has tooling integration for JaCoCo's output code coverage (see below).
Do note though, Lombok is not a panacea, and has detractors. For example, to generate code as an annotation processor, it in places relies on internal JDK APIs, though the situation has improved as the JDK exposes those APIs in portable ways.
Be sparing in disabling code coverage! JaCoCo knows about Lombok's
@Generated, and will
ignore annotated code.
A typical use is for the main() method in a framework such as Spring Boot
or Micronaut. For a command-line program, you will
want to test your main().
Do note that Lombok reflects on internal features of the JDK. If you have
issues, for Maven: use in your project the
--add-opens java.base/java.lang=ALL-UNNAMED
example from .mvn/jvm.config, and look to address these. The solutions in the
project are a "workaround" assuming Java 17. This is a two-edged sword:
as the JVM improves access controls, you may find, especially dependencies, that
there are times you want deep reflection.
Configure Lombok in
src/lombok.config rather than the project root or a separate config
directory. At a minimum:
config.stopBubbling=true
lombok.addLombokGeneratedAnnotation=true
lombok.anyConstructor.addConstructorProperties=true
lombok.extern.findbugs.addSuppressFBWarnings=true
Lines:
stopBubblingtells Lombok that there are no more configuration files higher in the directory treeaddLombokGeneratedAnnotationhelps JaCoCo ignore code generated by LombokaddConstructorPropertieshelps JSON/XML frameworks such as Jackson (this may not be relevant for your project, but is generally harmless, so the benefit comes for free)addSuppressFBWarningshelps SpotBugs ignore code generated by Lombok
- Automating
Dockerfile— YMNNALFT: Easy Docker Image Creation with the Spring Boot Maven Plugin and Buildpacks (NB — you do not need to have a Spring Boot project to use the plugin: just treat the plugin as a "regular" one)
Compilers targeting the JVM generally provide warning flags for dodgy code, and a flag to turn warnings into errors: Use them. The compiler is your first line of defense against code issues.
For example, with javac, add these compiler flags:
-Werror-- turns warnings into errors, and fails the build-Xlint:all,-processing-- enables all warnings except for annotation processing
Be judicious in disabling compiler warnings: they usually warn you for good
reason. For javac, disabled warnings might include serial or
deprecation.
Most JVM compilers support -Werror (eg, kotlinc, scalac, et al);
enabling/disabling specific warnings compiler-specific.
Lombok annotation processing fails -Xlint:all. Use -Xlint:all,-processing
to bypass warnings about annotation processing. In addition, using Lombok's
configuration to add suppression annotations on generated code (so other tools
will ignore generated code) needs the older Spotbugs annotations provided by a
dependency.
"Linting" is static code analysis with an eye towards style and dodgy code constructs. The term derives from early UNIX.
Linting for modern languages is simple: the compiler complains on your behalf. This is the case, for example, Golang. Having common team agreements on style and formatting is a boon for avoiding bikeshedding, and aids in:
- Reading a code base, relying on a similar style throughout
- Code reviews, focusing on substantive over superficial changes
- Merging code, avoiding trivial or irrelevant conflicts
Code style and formatting are entirely a matter of team discussion and
agreement. In Java, there is no recommended style, and javac is good at
parsing almost anything thrown at it. However, humans reading code are not as
well-equipped.
Pick a team style, stick to it, and enforce it with tooling.
With Java, one needs to rely on external tooling for linting. The most popular choice is:
However, Checkstyle will not auto-format code for you. For auto-formatting, consider, depending on your team preferences, any of these build plugins:
- Spotless — Focus on Google style
guides for Java. For Gradle, use the
spotlessApplytask to reformat; for Maven use thespotless:applygoal to reformat. It supports many source languages, not just Java - Rewrite — General framework for transforming source code with many extensions and plugins for different languages and frameworks. For Gradle, see Rewrite for Gradle with a focus on SUN style guides for Java; for Maven, see Rewrite for Maven with a focus on SUN style guides for Java
For your editor, consider the sample .editorconfig file in
this project. It is respected by IntelliJ and many other code editors.
(The sample uses 80-character line limits as IBM and Hollerith punch cards
intended, and helpful for speed readers of code. A worth point of team
discussion.)
The demonstration projects assume checkstyle configuration at
config/checkstyle/checkstyle.xml. This
is the default location for Gradle, and configured for Maven in the project.
The Checkstyle configuration used is stock
sun_checks.xml
(this is SUN default style for Java) with the addition of support for
@SuppressWarnings(checkstyle:...). Note that this format is overly
aggressive for Javadocs, and needs tweaking for most projects. See comments
in build.gradle about SUN vs Google styles for Java.
- If you use Google Java coding conventions, consider Spotless which can autoformat your code
- Consider use of EditorConfig for teams in which editor choice is up to each developer. EditorConfig is a cross-IDE standard means of specifying code formatting, respected by IntelliJ , and other major editors
Static code analysis is important in your build. This is analysis of your source and compiled bytecode which finds known issues ranging among other things:
- Idioms that your team finds poor or hard to read
- Dangerous anti-patterns (eg, missing
nullchecks in Java; your language may aid you in this, eg, Kotlin or Scala) - Insecure code (see Shift security left)
- Use of outdated code patterns (eg, Java 5 patterns might be better expressed with Java 17 improvements)
- Fail your build if issues are detected
The Gradle and Maven demonstration builds use these to help you:
And use the Find Security Bugs extension for Spotbugs.
- CPD for Gradle — see https://github.com/aaschmid/gradle-cpd-plugin. CPD works for Maven
Another static code analysis tool is Modernizer to check of use of obsolete
APIs and types; this is related to but not identical to deprecated APIs. An
example is moving to the JDK's Objects.equals from Guava's Objects.equal.
Note that Modernizer works at the bytecode level (not source code), so is suitable for any JVM language, not just Java.
- Find known code security issues — a plugin for SpotBugs
- DependencyCheck — verify your project dependencies against know security issues
Use checksums and signatures: verify what your build and project downloads! When publishing for consumption by others, provide MD5 (checksum) files in your upload: be a good netizen, and help others trust code downloaded from you
Read more at Verifying dependencies , an incubating feature.
Always run with the --strict-checksums (or -C) flag. See
Maven Artifact Checksums -
What? for more
information. This is easy to forget about at the local command line. The
.mvn/maven.config file helps this be
automatic, and can be checked into your project repository.
An alternative is to declare each repository in your user settings.xml and
set the checksum policy to
"fail".
However, in CI this is easy; another example of why local builds should repeat what CI builds do. The Batect configuration for the demonstration project says:
build-maven:
  description: Build and test with Maven
  run:
    container: build-env
    command: ./mvnw --strict-checksums clean verify
and the GitHub action says:
- name: Build and test with Maven
run: ./mvnw --strict-checksums verify(Batect and GitHub Actions are discussed both above.)
This is CRITICAL if you have any direct, indirect, or through-plugin dependencies on Log4j. Beyond your project, you may be impacted by services you call, so check with your organization or external services
DependencyCheck is the current best tool for JVM projects to verify that your project does not rely on external code with known security vulnerabilities ([CVEs](https://cve.mitre. org/)). That said, DependencyCheck does impact local build times. It is smart about caching, but will once a day may take time to download data on any new CVEs, and occasionally the site is down for maintenance. You may consider moving this check to CI if you find local build times overly impacted. Moving these checks to CI is a tradeoff between "shifting security left", and speed for local builds. I lean towards security first, however, you know your circumstances best.
This project fails the build if finding any CVEs for the current version of any dependency.
Your build should fail, too. It is a red flag to you to consider the CVE, what impact the vulnerable dependency has, and if you are comfortable with a vulnerable dependency. It is rarely (if ever) the case you keep a vulnerable version of a dependency.
DependencyCheck may be your slowest quality check in local builds (competing with mutation testing for that ignominious title). Sometimes it may fail when the upstream source for CVEs is offline. If this is a recurring problem for you, consider moving this check into CI. The downside that local work might use an insecure dependency for a while. Checking daily for updated dependencies can lessen this risk:
- Gradle:
./gradlew dependencyUpdates - Maven:
./mvnw versions:update-properties
For non-Windows platforms, you may see this warning when DependencyCheck runs:
.NET Assembly Analyzer could not be initialized and at least one 'exe' or 'dll' was scanned. The 'dotnet' executable could not be found on the path; either disable the Assembly Analyzer or add the path to dotnet core in the configuration.
In most situations, you are running in a Linux-based Docker container, or using local Linux or Mac command line. In a Windows project, this is an issue to address, and may be a serious security concern indicating you are missing critical Windows components. For other platforms, this is a nuisance message.
On Gradle when updating to version 7.x.x of DependencyCheck from 6.x.x or
earlier, first run ./gradlew dependencyCheckPurge to clear out the local
cache schema of CVEs.
DependencyCheck moved to schema v2 in 7.x.x from v1 in 6.x.x and earlier,
and the 7.0.0 Gradle plugin fails with the older schema version.
GitHub provides Dependabot (other systems than GitHub may have similar robot tools) which, among other things, can automatically issue PRs to your repository when security issues are discovered. This project uses Dependabot for Gradle and Maven.
NB — Dependabot is more reliable than either the Gradle or Maven plugins for dependencies.
- See the "Tips" section of Gradle or Maven
- With GitHub actions, consider adding a tool such as Dependabot, which automatically files GitHub issues for known dependency vulnerabilities. See earlier in this document for an example
- You can temporarily disable OWASP dependency checking via
-Dowasp.skip=truefor either Gradle or Maven, for example if the OWASP site is down for maintenance, and you cannot update the local CVE cache - The log4shell security vulnerabilities
(CVE-2021-44228,
CVE-2021-45046,
CVE-2021-45105
are extremely severe. They are so severe, this should be a top priority for
you to address regardless of other priorities. Although this project does not
use
log4j, local testing shows that theDependencyCheckplugin for either Gradle or Maven fails build when you use an older, insecure version oflog4j-coreindirectly. Note that Gradle 7.3.3+ itself fails your build if it detect a dependency on a vulnerable version oflog4j-core
- How to automate the
-C(checksum) flag in Maven? See Maven Artifact Checksums - What?
- JaCoCo
- "Ratchet" to fail build when coverage drops
- Fluent assertions — lots of options in this area
- AssertJ — solid choice
- Built assertions from Junit make is difficult for developers to distinguish "actual" values from "expected" values. This is a limitation from Java as it lacks named parameters
Unit testing and code coverage are foundations for code quality. Your build should help you with these as much as possible. 100% coverage may seem absurd; however, levels of coverage like this come with unexpected benefits such as finding dead code in your project or helping refactoring to be simple. An example: with high coverage (say 95%+, your experience will vary) simplifying your covered code may lower your coverage as uncovered code becomes more prominent in the total ratio.
Setup for needed plugins:
- For Gradle use the
javaplugin - For Maven, use more recent versions of the Maven Surefire Plugin
(See suggestion : Ignore the generated code for a Lombok/PITest issue.)
To see the coverage report (on passed or failed coverage), open:
- For Gradle,
build/reports/jacoco/test/html/index.html - For Maven,
target/site/jacoco/index.html
This project also provides the coverage report as part of Maven's project report.
- See discussion on Lombok how to
sparingly leverage the
@Generatedannotation for marking code that JaCoCo should ignore - Discuss with your team the concept of a "coverage ratchet". This means, once a baseline coverage percentage is agreed to, the build configuration will only raise this value, not lower it. This is fairly simple to do by periodically examining the JaCoCo report, and raising the build coverage percentage over time to match improvements in the report
- Unfortunately neither Gradle's nor Maven's JaCoCo plugin will fail your build when coverage rises! This would be helpful for supporting the coverage ratchet
- You may find mocking helpful for injection. The Java community is not of one
mind on mocking, so use your judgment:
- Mockito is the "standard" choice, and is a
dependency for the sample projects. For "modern" versions of Mockito, you
should use the
mockito-inlinedependency rather thanmockito-coreif relevant for your project: it supports mocking of static methods . SeeTheFooTest.shouldRedAlertAsStaticMockfor an example - PowerMock provides additional features; however, Mockito normally covers use cases
- Other Modern JVM languages — these languages may prefer different mocking libraries, eg, MockK for Kotlin
- You might consider complementary libraries to Mockito for specific circumstances, eg, System Lambda for checking STDOUT and STDERR, program exits, and use of system properties (eg, validate logging), also a dependency for the sample projects. (NB — these are generally not parallelizable tests as they alter the state of the JVM. Another is the JUnit Pioneer extension pack. If you need these, be cautious about using parallel testing features, and avoiding Flaky Tests)
- Mockito is the "standard" choice, and is a
dependency for the sample projects. For "modern" versions of Mockito, you
should use the
Unit testing is great for testing your production code. But have you thought about testing your unit tests? What that means is, how are you sure your tests really check what you meant them to? Fortunately, there is an automated way to do just that, no code from you required, only some build configuration.
Mutation testing is a simple concept: Go "break" some production code, and see
if any unit tests fail. Production bytecode is changed during the build—
for example, an if (x) is changed to if (!x)—, and the unit tests run.
With good code coverage, there should now be a failing unit test.
The best option for Modern Java/JVM mutation testing is PITest. It is under active development, does rather clever things with compiled bytecode, and has Gradle and Maven plugins. The main drawback for your local build is that PITest is noisy, so there might be more build output than you might expect.
Mutation testing is one of the slowest parts of a local build. You might consider moving mutation testing to CI-only to speed up local red-green-refactor cycle (_Red, Green, Refactor!, The Cycles of TDD). Use your judgment on the value of the CI build never or rarely failing (modulo external resources) when local build passes vs the speed of pushing good code.
After running a build using PITest, to see the mutation report (on passed or failed mutation coverage), open:
- For Gradle, open
build/reports/pitest/index.html - For Maven, open
target/pit-reports/index.html
This project provides the PIT report as part of Maven's project report.
- Without further configuration, PITest defaults to mutating classes using your project group as the package base. Example: Set the project group to "demo" for either Gradle or Maven if your classes are underneath the "demo.*" package namespace, otherwise PITest may complain that there are no classes to mutate, or no unit tests to run
- If you need to open modules (eg,
--add-opensflags), you need to include these flags in "jvm args" configuration for the plugin - Read more about Mutation Testing from Google
Here the project says "integration testing". Your team may call it by another name. This means bringing up your application, possibly with fakes, stubs, mocks, spies, dummies, or doubles for external dependencies (databases, other services, etc), and running tests against high-level functionality, but not starting up external dependencies themselves (ie, Docker, or manual comman-line steps). Think of CI: what are called here "integration tests" are those which do not need your CI to provide other services.
An example is testing STDOUT and STDERR for a command-line application.
(If you are in Spring Framework/Boot-land, use controller tests for your REST
services.)
Unlike src/main/java and src/test/java, there is no generally agreed
convention for where to put integration tests. This project keeps all tests
regardless of type in src/test/java for simplicity of presentation, naming
integration tests with "*IT.java". A more sophisticated approach may make sense
for your project.
If you'd like to keep your integration tests in a separate source root from unit tests, consider these plugins:
- For Gradle, use Gradle TestSets Plugin
- For Maven, use the Maven Failsafe Plugin
Caution: This project duplicates
ApplicationIT.java and
ApplicationTest.java
reflecting the split in philosophy between Gradle and Maven for integration
tests. Clearly in a production project, you would have only one of these.
- Failsafe shares the version number with Surefire. This project uses a
shared
maven-testing-plugins.versionproperty - Baeldung has a good introduction article on Maven Failsafe
- There are alternatives to the "test pyramid" perspective. Consider swiss cheese if it makes more sense for your project. The build techniques still apply
Can you do more to improve your build, and shift problems left (before they hit CI)? Of course! Below are some topics to discuss with your team about making them part of the local build.
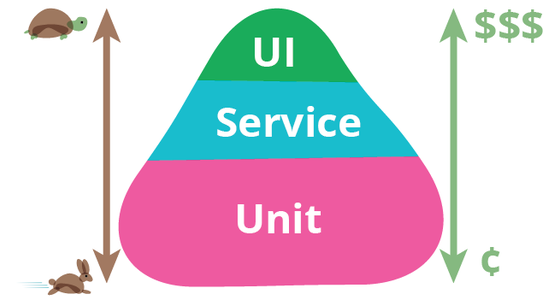
What is the "Test Pyramid"? This is an important conceptual framework for validating your project at multiple levels of interaction. Canonical resources describing the test pyramid include:
As you move your testing "to the left" (helping local builds cover more concerns), you'll want to enhance your build with more testing at different levels of interaction. These are not covered in this article, so research is needed.
NB — What this article calls "integration tests" may have a different name for your team.
"Live testing" here means spinning up a database or other remote service for local tests, and not using fakes, stubs, mocks, spies, dummies, or doubles . In these tests, your project calls on real external dependencies, albeit dependencies spun up locally rather than in production or another environment. These might be call "out of process" tests.
This is a complex topic, and this document is no guide on these. Some potentially useful resources to pull into your build:
- Flyway — Version your schema in production, and version your test data
- LocalStack — Local testing for AWS services
- TestContainers — Local Docker for real database instances, or any Docker-provided service
Depending on your program, you may want additional testing specific to circumstances. For example, with REST services and Spring Cloud, consider:
There are many options in this area. Find the choices which work best for you and your project.
Another dimension to consider for local testing: User Journey tests.
Both Gradle and Maven have tools to track performance time of steps in your build:
- Gradle build scans — Not limited to
Enterprise licenses, just build with
./gradlew --scan <tasks>and follow the link in the output. See a sample Gradle profile for this project. - Maven profiler — run
with
./mvnw -Dprofile <goals>and open the local link in the output. This project includes the setup for Maven extensions. See a sample Maven profile for this project.
TODO: Fix the sample profile links to display as pages, not as raw HTML.
Congratulations! You care, and you notice what is happening for your team.
Local build time is important: gone are the days when a multi-hour, or even
30+ minute build, are viewed in most cases as the "cost of doing business".
And "compiling" is rarely any longer where your project takes most local build
time.
Use the Gradle or Maven instructions in keep your build fast to profile your build, and spot where it spends time.
If you find your local build is taking too long, consider testing moving these parts to CI with the cost to you of issues arising from delayed feedback:
But beware! Your local build is now drifting away from CI, so you are pushing problems off later in your build pipeline. Not everyone pays close attention to CI failures, that is until something bad happens in production.
IMPORTANT — if you disable tools like the above in the local build, ensure you retain them in your CI build. Your goal in this case is speed up the feedback cycle locally while retaining the benefits of automated tooling. You are making a bet: problems these tools find come up rarely (but can be catastrophic when they do), so time saved locally repays time lost waiting for CI to find these problems.
In the Gradle and Maven samples in this repository, DependencyCheck and Mutation testing are typically the slowest steps in a local build; Integration tests are fast only because this project has very few (1), and are samples only. YMMV
Every project is different; your team and stakeholders need to judge the value of quicker feedback to programmers of these concerns, and quicker feedback from a faster local build. There is no "one size fits all" recommendation.
As much as you would like local builds to be identical to CI, this can still happen for reasons of environment. Examples can include:
- Credentials needed in CI have changed: Update your CI configuration
- Network routing has changed, and CI is in a different subnet from local: Talk with your Infrastructure team
- CI includes steps to push successful builds further down the line to other environments, and something there went wrong: Talk with your Infrastructure team
- Dependencies break in CI: If CI uses an internal dependency repository, check in with the maintainers of the repository
- Kristoffer Haugsbakk — Proofreading
- Sergei Bukharov — PMD enhancements